Katie Bishop is back with another recipe to make your mouth water.
I’m so grateful to her for doing this – I really hope you enjoy it!
________________
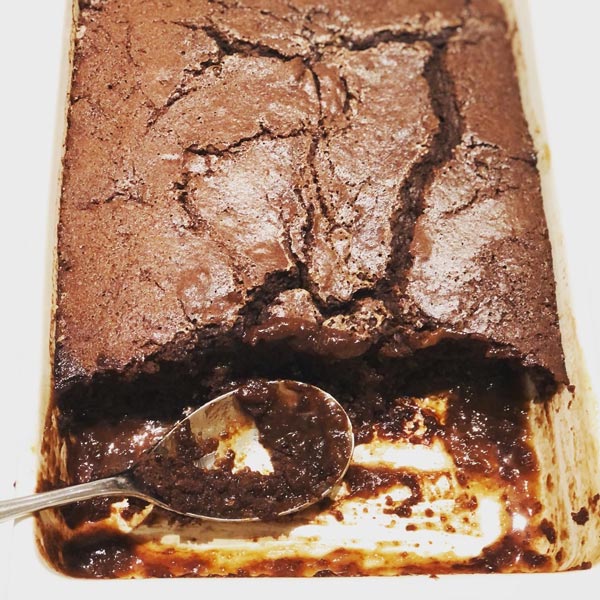
This deliciously rich pudding makes it’s own gooey sauce as it cooks. It’s one of those strange self-saucing bakes where you pour the sauce over the top of the cake batter, before baking. Then the layers swap over in the oven.
We call it an ‘impossible pudding’ in our house.
It’s lovely for Easter coming up, and a good way to use up leftover chocolate.
It can also be made in the slow cooker!!
___________
Overview
Preparation time: 15 minutes Cook: 30 mins
Serves: 8
Ingredients
100g butter, melted, plus extra for greasing
250g self-raising flour
140g caster sugar
75g cocoa
1 tsp baking powder
1 large orange, finely grated zest and juice
3 medium eggs
150ml milk
100g orange dark or milk chocolate, broken into pieces
200g light soft brown sugar
Let’s get cooking …
Preheat the oven to 180C, gas mark 4 and grease a 2 litre ovenproof baking dish with a little butter.
Put the flour, caster sugar, 50g of the cocoa, baking powder, orange zest and a pinch of sea salt flakes in a large mixing bowl.
Whisk the orange juice, eggs, melted butter and milk together, then gradually pour this onto the dry ingredients, whisking throughout, until smooth.
Stir in the chocolate pieces.
Spoon the mixture into the baking dish.
Mix 300ml freshly-boiled water with the soft brown sugar and remaining 25g cocoa.
Pour this all over the pudding batter – don’t worry, it will look really odd and unappetising at this stage!
Bake for 30 minutes, until the surface looks firm and risen.
Spoon into serving bowls, together with the rich, glossy sauce beneath. Eat immediately with cream, custard or vanilla ice cream.
You can even do this in a slow cooker:
Remove and grease the slow cooker pot. Follow steps 1 -5 above, then spoon the mixture into the slow cooker pot.
Mix 275-285ml (1/2 pint) freshly-boiled water with the soft brown sugar and remaining 25g cocoa then pour this over the batter.
Return the pot to the slow cooker base, cover and cook on high for 3 hours, until firm and risen.
______________
Katie will be back soon with something else delicious to try.
Katie Bishop is back with another recipe to make your mouth water.
I’m so grateful to her for doing this – I really hope you enjoy it!
________________
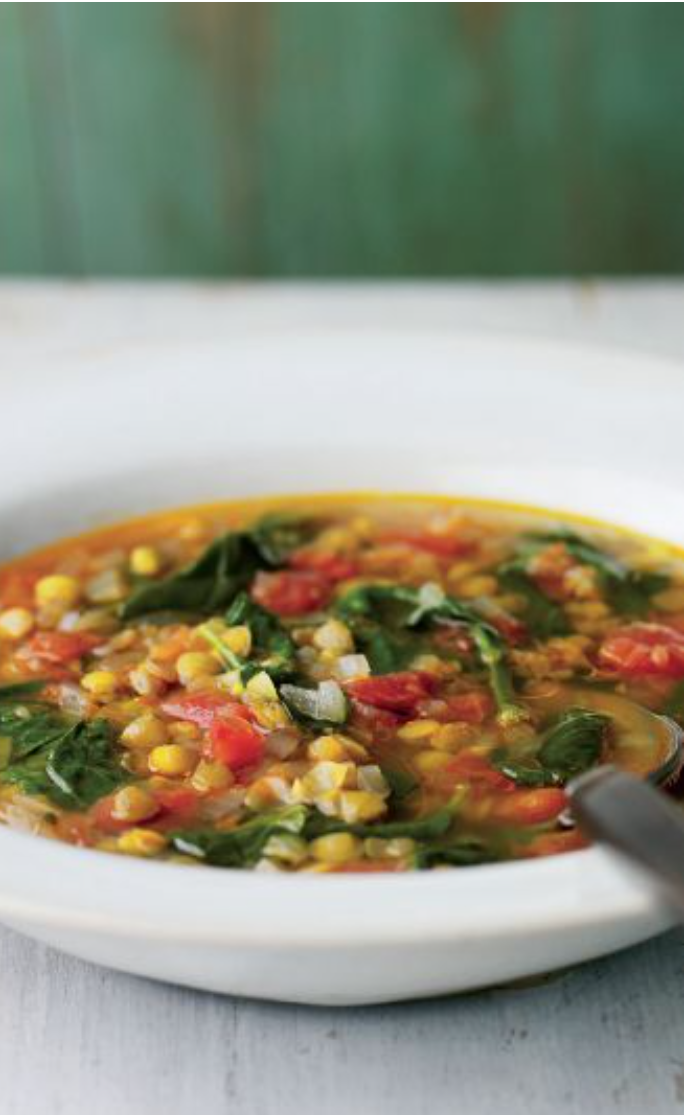
This colourful, hearty soup is packed with flavour. It’s also made in a slow cooker – so it’s really easy and faff-free.
Lentils and plenty of veg make this a nutritious, balanced bowl of goodness – perfect as a warming lunch or meal, and an excellent option during the menopause. I like to use rapeseed oil as it is rich in omega-3 fats – but use olive oil if you prefer.
You can also make this soup with either chicken or vegetable stock; and I like to serve the soup with a grating of Parmesan on top too, just to add a little calcium as this is so very important during menopause. If you’re vegetarian, use a suitable hard Italian-style cheese instead and keep the stock veggie.
Don’t have a slow cooker?
Simply sauté the garlic and vegetables together until softened, then add the herbs, tomatoes, and rinsed lentils, followed by the stock. Bring to the boil, before simmering very gently until completely tender. Add the spinach right at the end.
Fab for the freezer:
Leave the soup to cool completely before transferring to freezer proof containers, then covering and freezing for up to 3 months. Defrost before reheating gently on the hob until piping hot throughout (never reheat things in a slow cooker).
___________
Photo credit: Steve Baxter
Overview
Preparation time: 15 minutes Cook: 3-4 hours (in a slow cooker)
Ingredients
75g brown or green lentils
Rapeseed oil, enough to cover the base of the slow cooker 1-2mm
1 clove garlic
1 red onion, finely diced
1 celery stick, finely diced
400g can chopped tomatoes
2 sprigs thyme, leaves only
1 bay leaf, broken
2 litres chicken or vegetable stock
125g baby spinach leaves
Rapeseed oil or basil oil, to serve
Let’s get cooking …
Rinse the lentils under plenty of cold water and drain thoroughly. Pour enough olive oil into the slow cooker to cover the base with a depth of about 1-2mm.
Peel the garlic, then using your thumb, press the garlic firmly to bruise it. Add it to the dish with the oil.
Add the lentils and mix to coat in the oil. Stir in the onion, celery, tomatoes, and herbs. Don’t season the soup at this stage, as salt could toughen the lentils.
Pour in the stock. Cover with the slow cooker lid and cook on high for 3-4 hours or until the lentils are tender.
Using a slotted spoon remove the garlic and herbs. Mix the spinach into the soup and stir until the leaves are just wilted. Season to taste.
Ladle into warmed bowls and drizzle with a touch of extra virgin olive or basil oil before serving with crusty bread or toast.
______________
Katie will be back next month with something else delicious to try.
Katie Bishop is back with another recipe to make your mouth water.
I’m so grateful to her for doing this – I really hope you enjoy it!
________________
This really easy ‘pizza bianca’ recipe feels indulgent but can be made both economically and healthily.
The cream cheese (the white/bianca bit) makes a delicious change to tomato sauce on the base – use full-fat if reducing calories isn’t your priority, but I don’t think you’ll feel like you’re missing out when you taste this using the reduced fat version.
You can use any cooked sausage you have for the top – I like using chorizo, nduja, or even a bog-standard banger that I might have leftover.
Tenderstem broccoli is delicious on top, but just use whatever you have available – finely sliced standard broccoli; cauliflower; courgette or pepper strips; or whole spring onions; all work well too.
Use a ready-made pizza base for ease (all major supermarkets sell them fresh, frozen and in free-from versions – so there’s something for everyone. You could even make this recipe vegan with the appropriate base and swaps for the cheese and sausage), or if you have more time, why not make your own?
Enjoy!
___________
Overview
Preparation time: 15 minutes Makes: 1 pizza
Ingredients
1 ready-made pizza base
¼ unwaxed lemon (save the rest to dress some salad leaves to serve alongside)
125g reduced fat cream cheese
60-75g Tenderstem broccoli
About 100g cooked sausage
½ small red onion, thinly sliced
1 tsp capers in brine, drained
½ tsp fennel seeds
Olive oil, for drizzling
Salad leaves, to serve
Let’s get cooking …
Preheat the oven to 220C, gas mark 7. Put the pizza base on a large baking tray and bake for 3 minutes.
Meanwhile, stir the lemon zest into about two-thirds of the soft cheese. Season. Spread over the pizza base, leaving a 2cm border around the edge.
Scatter over the broccoli, halving any thick stems. Tear the cooked sausage into pieces and scatter over too. Dot with the remaining cream cheese, then scatter over the red onion, capers, and fennel seeds. Season and drizzle with a little olive oil.
Bake for 8-10 minutes, until the base is golden, and everything is piping hot. Serve immediately with salad leaves seasoned and dressed with a little lemon juice and olive oil.
______________
Katie will be back next month with something else delicious to try.
https://jotuffrey.com/wp-content/uploads/Sausage-and-tenderstem-pizza.jpg6301500[email protected]https://jotuffrey.com/wp-content/uploads/JT-LOGO-BLUE.png[email protected]2022-03-21 10:30:392022-03-22 08:54:54Recipe of the month – Sausage & tenderstem broccoli white pizza
Katie Bishop is back with another recipe to make your mouth water. This month, she’s developed a recipe for January with ‘health’ at its core.
I’m so grateful to her for doing this – I really hope you enjoy it!
________________
This is a bit of a cheat’s mousse really, but it tastes and looks great, and is a perfect last minute pudding when you need one.
Cook’s tip: agave is a natural sweetener and is now available in most supermarkets. It’s much lower in calories than sugar, so it makes a great alternative if you are trying to reduce your intake. It also works well in hot drinks, on cereals and in cocktails!
NB: This recipe contains raw egg, so please be aware that it is not suitable for the elderly, young children, or those with a compromised immune system.
___________
Overview
Preparation time: 10 minutes plus chilling Serves: 4 people
Ingredients
175g fresh raspberries, plus extra to serve
1 ½-2 tbsp agave (or 25-50g caster sugar), to taste
1/2 tsp vanilla bean paste or extract
125g fat free strained Greek yogurt
2 large egg whites
Let’s get cooking …
1. Mix the raspberries with the agave (or 25g sugar), vanilla and yogurt in a large bowl, crushing the fruit thoroughly with the back of the spoon as you go. Taste for sweetness.
2. Whisk the egg whites in a separate bowl until forming firm peaks – you should be able to turn the bowl upside down without any falling out!
3. Add the egg white to the raspberry mixture and fold in gently until combined. Add extra agave (or sugar) to sweeten, if needed.
4. Spoon into 4 small serving dishes or glasses, decorate with extra raspberries and serve immediately, or cover and chill for up to 30 minutes.
______________
Katie will be back next month with something else delicious to try.
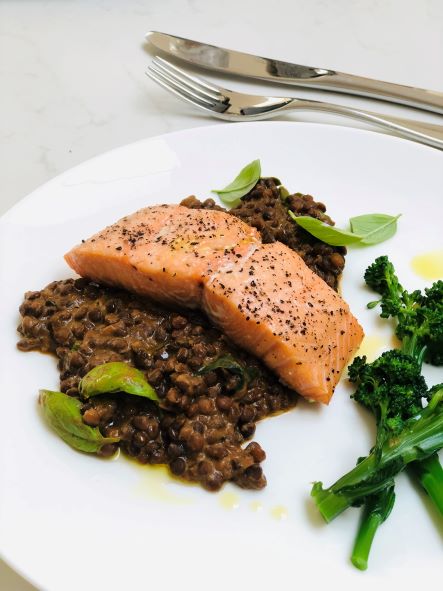
Katie Bishop is back with another recipe to make your mouth water. This month, she’s developed one specifically for my Menopause Metamorphosis programme as part of the self-care Sunday feature. I’m so grateful to her for doing this – I really hope you enjoy it!
________________
This incredibly easy recipe uses only a few products, but tastes great. You can vary the grains depending on what you have in the cupboard, or what you like to eat, but the pack of lentils I use in this recipe has lots of great flavour which really adds to the dish, so I would strongly recommend it.
“I’m not a nutritionist, but I do know that the most important thing to remember when eating during menopause, is to ensure you have a balanced plate of food.”
That means it needs to include wholegrain carbs for slow release energy, a good source of protein (salmon is good because it’s high in vitamin D), healthy unsaturated fats (so that’s things like olive oil, nuts, seeds etc), and preferably some calcium too.
Osteoporosis can be an issue during menopause, so it’s important to look after your bones. Calcium and vitamin D are both critical for this.
This recipe ticks all of those nutrition boxes, but also tastes delicious and feels comforting, warming and wholesome to eat.
___________
Overview
Preparation time: 5 minutes Time to cook: 10-12 minutes Serves: 2 people
Ingredients
2 x 250g lightly smoked salmon fillets (or unsmoked, if you prefer)
Extra virgin olive oil, to drizzle
200g Tenderstem broccoli (or other favourite green veg)
About 10-15g basil
250g pack Merchant Gourmet Tomatoey French Puy & Green Lentils
2 tbsp half fat crème fraiche
Let’s get cooking …
Preheat the oven to 220C, gas mark 7. Line a baking sheet with foil. Put the salmon on top, skin-side down. Drizzle with olive oil and season well. Bake for 10-12 minutes or until just cooked through.
Meanwhile, bring a medium pan of water to the boil. Cook the broccoli for 4 minutes, then drain and keep warm.
Return the pan to a low heat. Trim then finely chop the basil stalks. Place them into the pan with the lentils and 2-3 tbsp water. Cook over a low heat for 2-3 minutes, until piping hot.
When the salmon is cooked, stir the crème fraiche and whole basil leaves through the lentils. Spoon onto warm plates.
Serve the salmon, leaving the skin behind on the foil (unless you like to eat it), on top of the lentils, with the broccoli, seasoned and drizzled with olive oil, on the side.
______________
Katie will be back next month with something else delicious to try.
https://jotuffrey.com/wp-content/uploads/Salmon-with-lentils-and-basil.png6301500[email protected]https://jotuffrey.com/wp-content/uploads/JT-LOGO-BLUE.png[email protected]2021-10-28 08:00:142022-01-17 09:50:09Recipe of the month – Salmon with basil & lentils
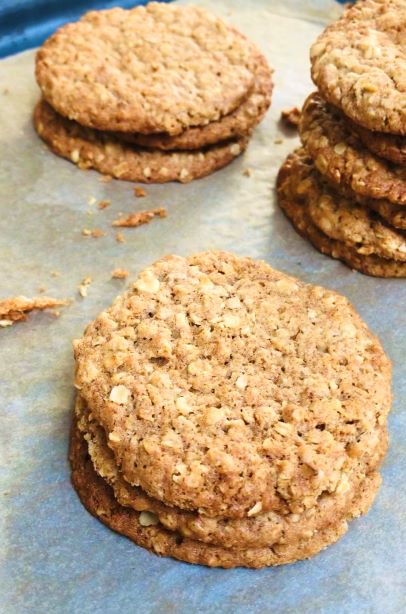
Preheat the oven to 180C, gas mark 4 and line a baking tray with baking parchment.
Mix the flour, baking powder, oats, sugar and mixed spice together in a large bowl.
Melt the butter, syrup and milk together in a small saucepan over a low heat or in the microwave, until just melted.
Once complete, pour it over the oat mixture and stir everything together until evenly coated.
Spoon the mixture into 12 rounds on the prepared baking tray – I like to use a round cookie cutter as a guide so they all end up about the same size – and do make sure you leave space between each biscuit, as they will spread during cooking.
Bake for 10-12 minutes, or until golden.
As soon as the tray comes out of the oven, use a large heatproof cutter to ‘scoot’ the hot biscuits.
Always wanted to know what ‘scooting’ means? Place the cutter over each cookie and swirl it inside the cutter to round the edges. That way they all end up the same size and shape! Leave to cool on the tray.
Watch a video of Katie making these cookies and ‘scooting’!
https://jotuffrey.com/wp-content/uploads/Cookie-jar.jpg6301500[email protected]https://jotuffrey.com/wp-content/uploads/JT-LOGO-BLUE.png[email protected]2021-07-14 16:15:192021-07-14 16:15:19Recipe of the month – Spiced oat cookies
Katie Bishop is back with another recipe to make your mouth water – easy fish pie.
As this recipe says – it’s super easy, as well tasty and nourishing.
This is great for a family meal or entertaining a group – what’s also brilliant is that you can make it ahead of time too.
___________
Overview
Preparation time: 10 minutes Time to cook: 20 minutes Serves: 6 people
Ingredients
500ml whole milk
2 fresh bay leaves
1 small onion, finely chopped
3-4 anchovies in olive oil, drained and chopped
4 tbsp cornflour
4 tbsp dry white wine
750g mixed fish fillet (haddock, cod, salmon), skinned, cut into large chunks
150-250g raw, peeled king prawns
2 tbsp flat-leaf parsley, chopped
75g fresh breadcrumbs
25g Parmesan, finely grated
Let’s get cooking …
Preheat the grill to medium.
Pour the milk into a large, shallow, ovenproof and flameproof casserole dish (or use a saucepan and transfer to an ovenproof dish later).
Add the bay leaves, onion and anchovies and bring to a gentle simmer for 5 minutes or until the onion is tender.
Mix the cornflour with 4 tbsp cold water to make a paste. Stir into the milk and simmer for 2-3 minutes, until thickened slightly.
Stir in the white wine and then the fish. Season and cook for 2-3 minutes.
Stir in the prawns and cook for a further 3-5 minutes or until the prawns are pink. Remove the bay leaves, then add the parsley.
If needed, transfer the mixture into a 2 litre ovenproof dish.
Mix the breadcrumbs and cheese together, then scatter over the top of the fish.
Grill for 5 minutes or until golden and bubbling. Serve immediately. Great with steamed green beans.
Other ideas
If you’re a fan of peas, add a few handfuls of frozen or fresh peas to the mixture at the same time as the fish.
If you want to make this ahead, just make the fish layer, then cool, cover and chill for up to 24 hours, then when ready to eat, reheat gently and add the crumbs at the last minute and continue as above.
______________
Katie will be back next month with something else delicious to try.
https://jotuffrey.com/wp-content/uploads/Easy-fish-pie.jpg6301500[email protected]https://jotuffrey.com/wp-content/uploads/JT-LOGO-BLUE.png[email protected]2021-06-08 08:00:452021-06-04 14:51:57Recipe of the month – Easy fish pie
Katie Bishop is back with another recipe to make your mouth water …
This recipe is fantastic, as Katie has thought this would be a great recipe to make, after having seen the conversation with Jo and Dr Sophie Bostock on sleep ….
So, over to Katie …
Now, I am not a nutritionist, but there is anecdotal evidence to suggest that eating turkey can help you sleep!
According to healthline.com ‘Turkey has a few properties that explain why some people become tired after eating it, or think it encourages sleepiness. Most notably, it contains the amino acid tryptophan, which increases the production of melatonin.’
The protein in turkey may also contribute to its ability to promote tiredness.
There’s evidence that consuming moderate amounts of protein before bed is associated with better sleep quality, including less waking up throughout the night.
Although it is clear that more research is necessary to confirm turkey’s potential role in improving sleep.
I’ve heard that almonds, walnuts, dairy and bananas are also thought to be helpful when it comes to dropping off … but as I say, I’m not a nutritionist. All I know is they’re all really tasty and are great as part of a balanced diet, so if they help sleep too, then that’s just a bonus!
___________
Katie will be back next month with something else delicious to try.
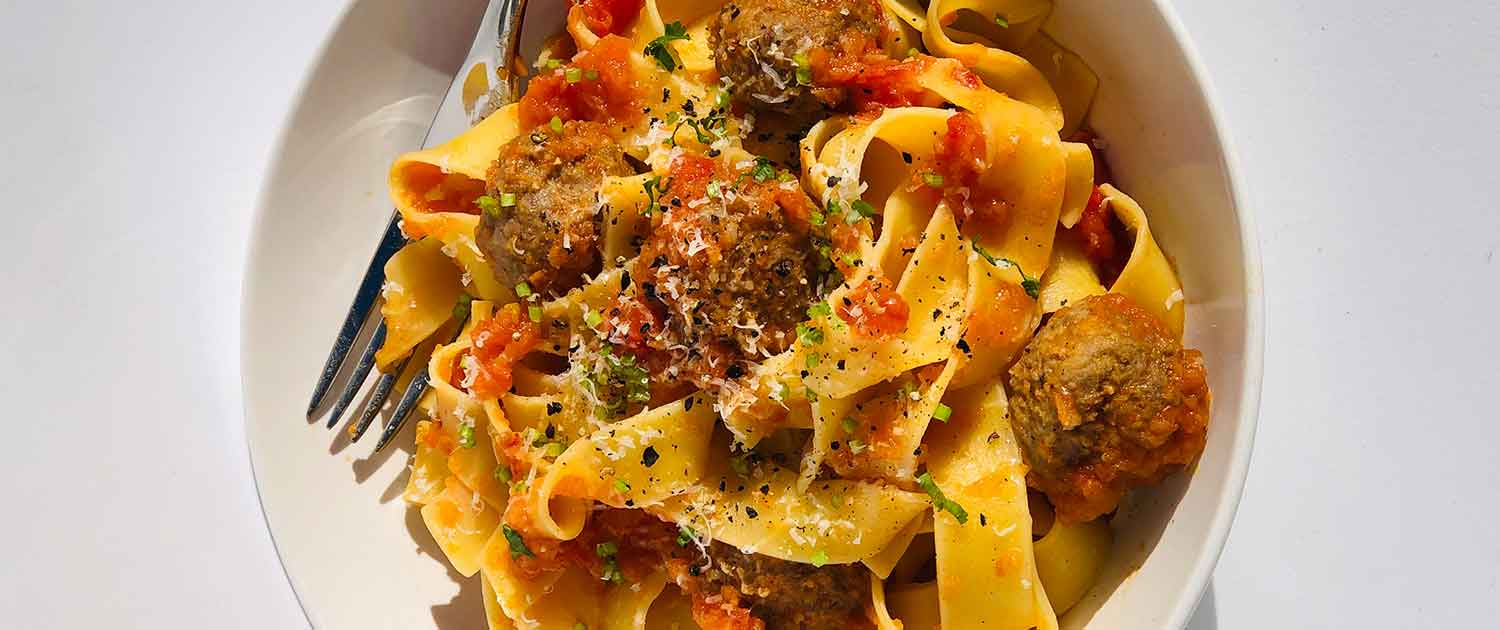
Preparation time: 20 minutes Time to cook: 45-55 minutes Serves: 6 people
These meatballs are really quick and easy to make, so they’re perfect for a meal during the week.
They also contain lots of ‘hidden’ vegetables and so they are great for increasing your daily quota, or to help when it comes to feeding children who don’t overly enjoy eating them!
You can freeze these meatballs along with the sauce (either together or separately) so they’re always ready to use for a quick midweek meal. Simply defrost in the fridge overnight, and of course – always be sure to heat them thoroughly before seaving.
Add the onion, celery, carrot and garlic into a food processor and blitz until very finely chopped (or if you’re feeling energetic, you can do this by hand). Reserve 2 tablespoons of the mixture for the meatballs (step 4).
Next, warm the oil in a large, heavy frying pan or shallow casserole dish, add the vegetable mixture, along with the thyme (as an option), and cook over a low heat, stirring occasionally, for around 10 minutes.
Add the chopped tomatoes, remembering to fill up each empty can with water and add that to the pan too. Season with the sugar, 1 tsp sea salt flakes and a good grind of pepper. Stir well, letting the mixture come to the boil, then turn the heat down and simmer gently while you make the meatballs.
Put the reserved blitzed veg into a large mixing bowl with the mince, breadcrumbs, cheese and Worcestershire sauce. Season with 1/2 tsp sea salt flakes and mix together well with your hands.
Moisten your hands with a little cold water and roll teaspoon sized pieces of the mixture into balls. Put each one onto a large, lined baking tray or board as you go, to make about 50 little meatballs (or fewer bigger ones! Size is completely up to you!).
Add the meatballs into the simmering sauce – working from the outside of the pan, inwards, in concentric circles. Simmer gently for 20-30 minutes, turning the balls over halfway through, until they are thoroughly cooked and there is no pink meat.
I would suggest you serve them with pasta, rice, couscous or even a jacket potato or wrap.
We’re so excited to announce our brand new resident food contributor – Katie Bishop.
Katie won the Young Cook of Britain competition at the tender age of 14! She travelled the world working as a chef and cemented her dream of becoming a professional food writer.
“It is not uncommon for me to be thinking about what I’m going to eat for supper while I’m still eating my lunch.”
She has now been a freelance food writer, editor, stylist and consultant for 20 years. She works with magazines and publishers, writing books and editorial features, as well as making food look beautiful for photos. She also works in advertising and film, presents cookery demonstrations and appears on TV and radio.
We’re incredibly fortunate to have her contribute to our lifestyle magazine here at jotuffrey.com
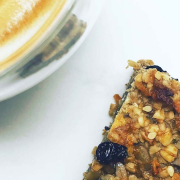
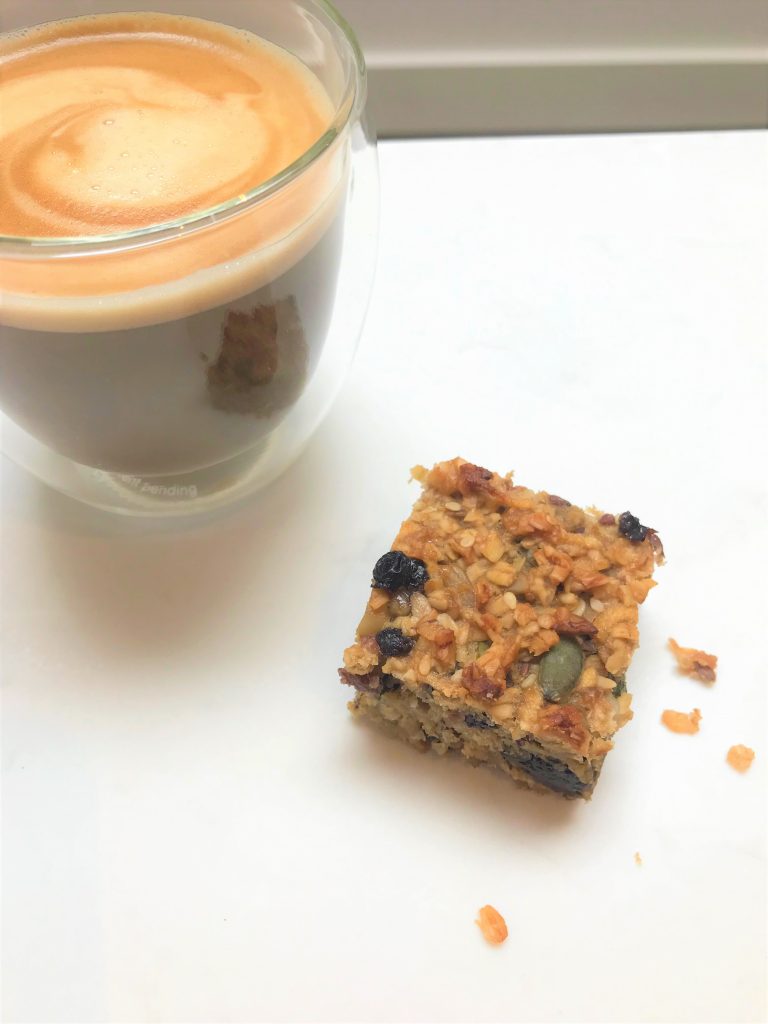
Today – she introduces us to Banana, apple & honey flapjacks …
________________
Overview
Preparation time: 10 minutes Time to cook: 60 minutes This recipe makes: 16 flapjacks
If you’re trying to sneak some extra fruit in to your diet (or that of your children) without feeling too hard done by, then this recipe is for you. It’s an extremely easy and quick bake that will satisfy sweet cravings, without any added sugar – just honey. They’re flour-free too!
The banana and apple elements increase your fruit intake, whilst helping to bring the mixture together. The benefit being that you don’t need so much butter or sugar.
Feel free to mix it up a little – use what you can find in the cupboard! Dried apricots, cherries, cranberries, raisins or mixed dried fruit all work well. Poppy seeds are always a good addition to bakes and some chia would taste good too.
Katie says that you can use over-ripe bananas and apples – there’s nothing worse than food waste – this will help keep it down.
It’s good to experiment – try adding some finely grated orange or lemon zest to the mixture, before baking.
You can of course turn this into something slightly less healthy – by drizzling melted chocolate (white, milk or dark) over the top – we’ll let you decide on that.
So – let’s take a look at how to get these done!
Ingredients
50g butter, plus extra for greasing the tin
2 tbsp smooth peanut butter
3 tbsp honey
2 bananas
2 small eating apples
250g porridge oats
100g prunes
75g currants or raisins
75g mixed seeds (eg. pumpkin, sunflower, sesame & linseeds)
Let’s get cooking …
Preheat the oven to 160˚C, gas mark 3 and grease a 20cm square tin.
Melt the butter, peanut butter and honey into a small saucepan over a low heat. Stir the ingredients to combine.
Whilst simmering, mash the banana and coarsely grate the unpeeled apple into a bowl (don’t worry about removing the core in advance, just grate around it).
Mix the fruit into the melted butter mixture. Add 100ml hot water and stir.
Add the oats to a large bowl. Add the prunes – snipping them up using scissors, to make pieces about the size of a plump raisin.
Next, add the currants and seeds.
Finally, mix in the banana mixture until everything is well coated. Simple so far?!
It’s time to get baking next. Tip into the prepared tin and spread out to level the surface. Bake for 55 minutes or until golden brown.
Leave to cool in the tin for at least 2 hours, before turning out and cutting into squares. Enjoy with tea or coffee!
More about Katie
Katie will be back next month with something else delicious to try.
https://jotuffrey.com/wp-content/uploads/Flapjacks.jpg6301500[email protected]https://jotuffrey.com/wp-content/uploads/JT-LOGO-BLUE.png[email protected]2021-04-10 12:19:592021-04-29 08:28:19Recipe of the month – Banana, Apple & Honey Flapjack
Jo loves coffee – you’ll hear her talking about it during her workouts regularly.
Recently, she was approached by Alex Higham, the founder of Exhale Coffee. Alex is an expert in the chemical composition of coffee and has conducted all kinds of experiments with labs to test the various properties of his coffee blend as well as others.
Imagine a coffee with health benefits in the same league as fresh fruit and vegetables? Well that’s what Alex and his team have been researching and developing for the last 2 years and Jo wanted to find out more.
She spent some time on Zoom with Alex recently and we’ve put together this amazing interview. If you think you know about the properties of coffee and how important it is in our lives – then think again!
As a taster, did you know that 1 cup of exhale coffee has the same antioxidant power as 12 punnets of blueberries, 55 oranges or 1.2kg of kale!
Find out more in this interview between Jo and Alex …
Enjoy the full interview below – or have a read of some of the highlights below …
The health benefits of drinking coffee
Alex Higham: Coffee is a fruit – coffee grows on trees and coffee starts its life as a cherry So a coffee bean, isn’t a bean at all It’s a seed. So coffee is a fruit!
Jo Tuffrey: Actually, I’ve never really thought where coffee comes from!
Alex Higham: It’s seen as this lifeless brown bean that makes this kind of black coffee, but all I’m trying to say is, look, coffee is a fruit – coffee comes from fruit!
Jo Tuffrey: Introduce yourself and say who you are ….!
Alex Higham: Yes, I’m Alex. The company is called Exhale Coffee and we launched around six months ago in lockdown after a good two or three years of researching, developing and building the idea for the business It’s been a long journey, but basically over the last few years, I have been reading more and more about the science around coffee.
More and more, the studies are pointing towards coffee as being a superfood with lots of different health benefits. So it’s potentially been associated with the reduced risk of all sorts of different diseases.
Coffee is one of the most drunk beverages in the world. It’s also one of the most studied. In the last 10 years, there has been over 8,000 studies on coffee and its implications on health alone. Because it’s so wildly drunk, people are really interested in how it affects your health.
Jo Tuffrey: So what are the benefits then of drinking coffee?
Alex Higham: There’s been all of these studies over many decades. The studies have moved from observational studies, where they look for associations between drinking coffee and different diseases, and looking at the kinds of mechanisms of the action of drinking coffee could be having in the body, which could be causing these benefits.
How often should you have a cup of coffee?
Jo Tuffrey: Would you advocate drinking your coffee all through the day or whenever suits the person?
Alex Higham: I would advocate drinking coffee all day long, right up until bedtime, but to choose a decaf after a certain time of the day. And it depends on your own personal gene …
So you have a gene which dictates how fast you are breaking down the coffee and caffeine and another gene which dictates how fast you are absorbing the caffeine. So it’s your combination of those two genes, which dictates how long the caffeine will have an effect in your body.
I’m actually a really slow caffeine metabolizer. So if I have a coffee after about lunchtime, I can’t sleep at night, whereas other people can. The fast metabolizers of caffeine can have a coffee just before bed and they’ll burn off the caffeine and then they’ll sleep.
However, decaf really does have a lot of benefits as well. So in the afternoon I switched to decaf and then recently have started having a decaf before bed because there’s a whole load of benefits around fasting.
Does coffee help with pilates and fitness?
Jo Tuffrey: Will we be able to do more planks?! Will we be able to do more curl ups? Is it shown to enhance performance?
Alex Higham: Oh, definitely. I mean, caffeine in particular is one of the few proven ergogenic cases for sport.
Up until the early nineties, coffee was banned by the world anti-doping association, but then it made it legal more recently. The studies show that if you drink quite a lot of coffee, (between three and six milligrams of caffeine per kilo of body weight), which is probably about the equivalent of two double espressos – that’s where you would get the real benefit.
Jo Tuffrey: I don’t think my clients would allow me to have that!
Alex Higham: No, exactly. But if they do there’s two separate meta analyses, which show that caffeine increases exercise performance by 11 to 12% on average.
How do you make the ultimate cup of coffee?
Jo Tuffrey: Now I’ve heard that you shouldn’t pour boiling water onto coffee. Should you do that or not?
Alex Higham: No! So if you add boiling water to the coffee it can scold the beans and it can over extract some of the bitter flavour compounds in the coffee.
So the advice we give is to boil the kettle … leave it 30 seconds off the boil and then pour it!
However – you don’t want to let it cool too much because the extraction of all of the compounds and the healthy compounds, the good stuff from coffee is a chemical reaction. Chemical reactions are all sped up by hotter temperatures. It’s standard law of chemistry. The hotter, the temperature during the reaction, the faster it will take place.
If you let the water cool too much, then it’s not going to be hot enough to extract the healthy compounds. So you want to let it cool just off the boil, but not too much.
Find out more about Exhale Coffee
Visit Alex’s business at https://exhalecoffee.com/
https://jotuffrey.com/wp-content/uploads/Health-benefits-of-drinking-coffee.jpg6301500[email protected]https://jotuffrey.com/wp-content/uploads/JT-LOGO-BLUE.png[email protected]2021-03-23 13:57:012021-04-29 08:28:39The health benefits of drinking coffee


 1 onion, peeled